- Step 1: Download the Font from Google Fonts
- Step 2: Unzip the Font
- Step 3: Access the Auto Featured Image PRO Plugin
- Step 4: Upload the Font to WordPress
- Step 5: Validate the Font Installation
- Conclusion
In this article, we will guide you through the process of installing a font to use with the Auto Featured Image PRO plugin on your WordPress site. This will allow you to further customize your featured images with unique fonts. Follow these simple steps:
Step 1: Download the Font from Google Fonts
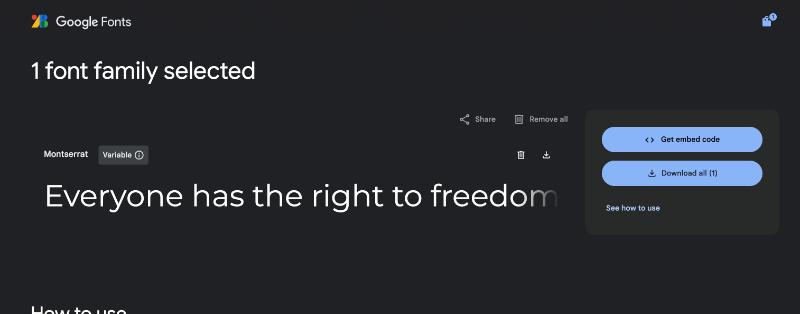
First, we need to download a font from Google Fonts. Here’s how:
- Open your browser and visit Google Fonts.
- Search for the font you like, for example, "Roboto".
- Once you've found it, click the "Select this font" button.
- On the right corner, click the download icon to get the ZIP file of the font.

Step 2: Unzip the Font
Once the font is downloaded, we need to unzip the ZIP file to get the font files:
- Locate the ZIP file on your computer.
- Right-click on the file and select "Extract All" or use your preferred extraction software.
- Save the unzipped files in an accessible folder.
Step 3: Access the Auto Featured Image PRO Plugin
Now, we need to access the Auto Featured Image PRO plugin in your WordPress dashboard:
- Log in to your WordPress dashboard.
- In the left-hand menu, go to the plugins section and find "Auto Featured Image PRO".
- Click on the menu item "Font Family: Media Library".

This will redirect you to the WordPress Media Library.
Step 4: Upload the Font to WordPress
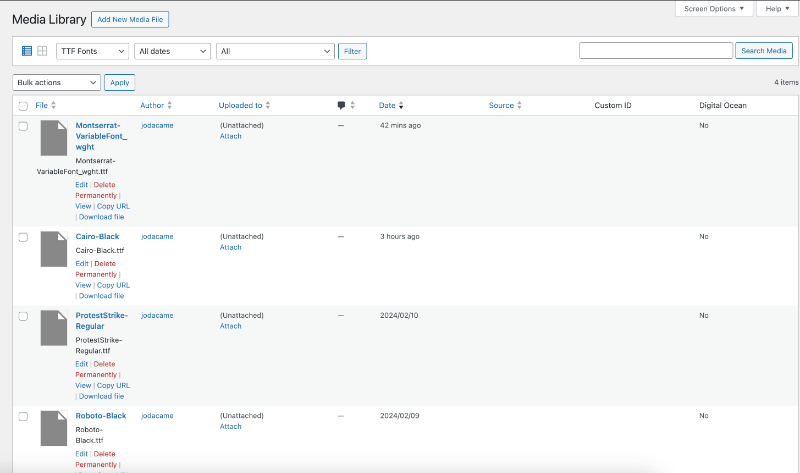
Once in the Media Library, we need to upload the font files:
- Click on "Add New" at the top of the screen.
- Select the font files you unzipped earlier.
- Click "Open" to upload the files to the Media Library.

Step 5: Validate the Font Installation
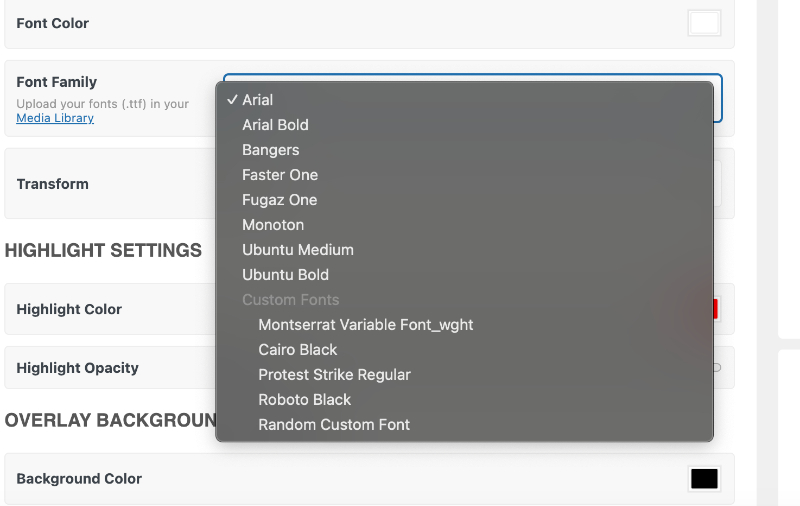
After uploading the font, we need to verify that it is available in the Auto Featured Image PRO plugin:
- Go back to the Auto Featured Image PRO plugin.
- Verify that the new font appears in the list of available fonts.
Now, you can select the new font and use it in your featured images.

Conclusion
And that's it! You’ve learned how to download, unzip, and install a font in WordPress using the Auto Featured Image PRO plugin. Now you can customize your featured images with unique fonts and make your website look even better.
If you found this tutorial helpful, don’t forget to share it and leave your comments. Thank you for reading!